
quarto helpA little over a year ago I decided to start blogging again, and set up this site. At the time I made the deliberate choice to use distill as my blogging platform rather than something that would require a static site generator like hugo or jeykll, and I don’t regret that choice. However, along the way I’ve found a few things that have bothered me about using distill. It’s never been worth considering changing to something new though, because distill has so many things that I do like. Until now.
Enter, stage left, quarto.
Now out of stealth mode and attracting no end of attention, quarto offers the promise of being a cross-platform, cross-format, open source publishing tool based on pandoc. Intrigued, I decided to play around with it for a while, and ended up making the decision to port this blog from distill to quarto. This post outlines my process.
(I am a little nervous: porting a blog often involves recomputing things. Will it work? Will everything turn out to be reproducible? I hope so…)
Getting started
The very first thing I do is go read Alison Hill’s wonderful We don’t talk about quarto blog post. If you’re an R markdown user considering making the jump to quarto and haven’t already read her summary of where things are at, you won’t regret it. It’s a nice high level overview. I’d also suggest Nick Tierney’s notes on making the switch, which is very helpful also.
After doing my background reading, I go to the get started page on the quarto website to download the installer file. I’m on Ubuntu, so for me that’s a .deb file. I install it in the usual way from the command line:
sudo dpkg -i quarto-0.9.282-linux-amd64.debNow that I have quarto installed, I’m able to use it to create a blog. My old distill blog exists in a project folder that I’d imaginatively named distill-blog, so I decide to keep to tradition and create the quarto version in an equally boring project folder called quarto-blog.
There is a page on the quarto website that walks you through the process for creating a blog, which I dutifully follow. From the terminal, I use the quarto create-project command, and a variety of files are created:
quarto create-project quarto-blog --type website:blogCreating project at /home/danielle/GitHub/sites/quarto-blog:
- Created _quarto.yml
- Created index.qmd
- Created posts/welcome/index.qmd
- Created posts/post-with-code/index.qmd
- Created about.qmd
- Created styles.css
- Created posts/_metadata.ymlComing from an R markdown background, this is very familiar:
- The files with a
.qmdextension are the quarto markdown documents. These contain source code for the blog posts (the two files in thepostsfolder), the home page (theindex.qmdfile in the project root folder) and a standalone “about me” page for the blog (theabout.qmdfile). - The files with a
.ymlextension are the YAML files used to configure the blog. I don’t notice this at first, but the fact that there are two of them is important. The_quarto.ymlfile is used for settings that will apply across the entire site, but you will often want to configure settings that only apply to your blog posts. Those can be set by editing theposts/_metadata.ymlfile. - The
styles.cssfile can be used to specify custom CSS rules that will apply to the whole site. I’ll talk more about styles later.
Rendering posts
There are several different ways to interact with quarto. For example, later in the post I’ll talk about the quarto command line interface which allows you to work with quarto without going through R or RStudio. However, when getting started I try to keep things simple, and go with the option that was most familiar to me: I use RStudio.
To do this, it’s convenient to have an RStudio project for my blog. Using the RStudio file menu, I create a new project from an existing directory (i.e., my quarto-blog folder), which supplies the quarto-blog.Rproj file and other infrastructure needed to work with my new quarto blog as an RStudio project. Once that’s done, I am able to open up a quarto file in the RStudio editor and see a familiar looking interface:
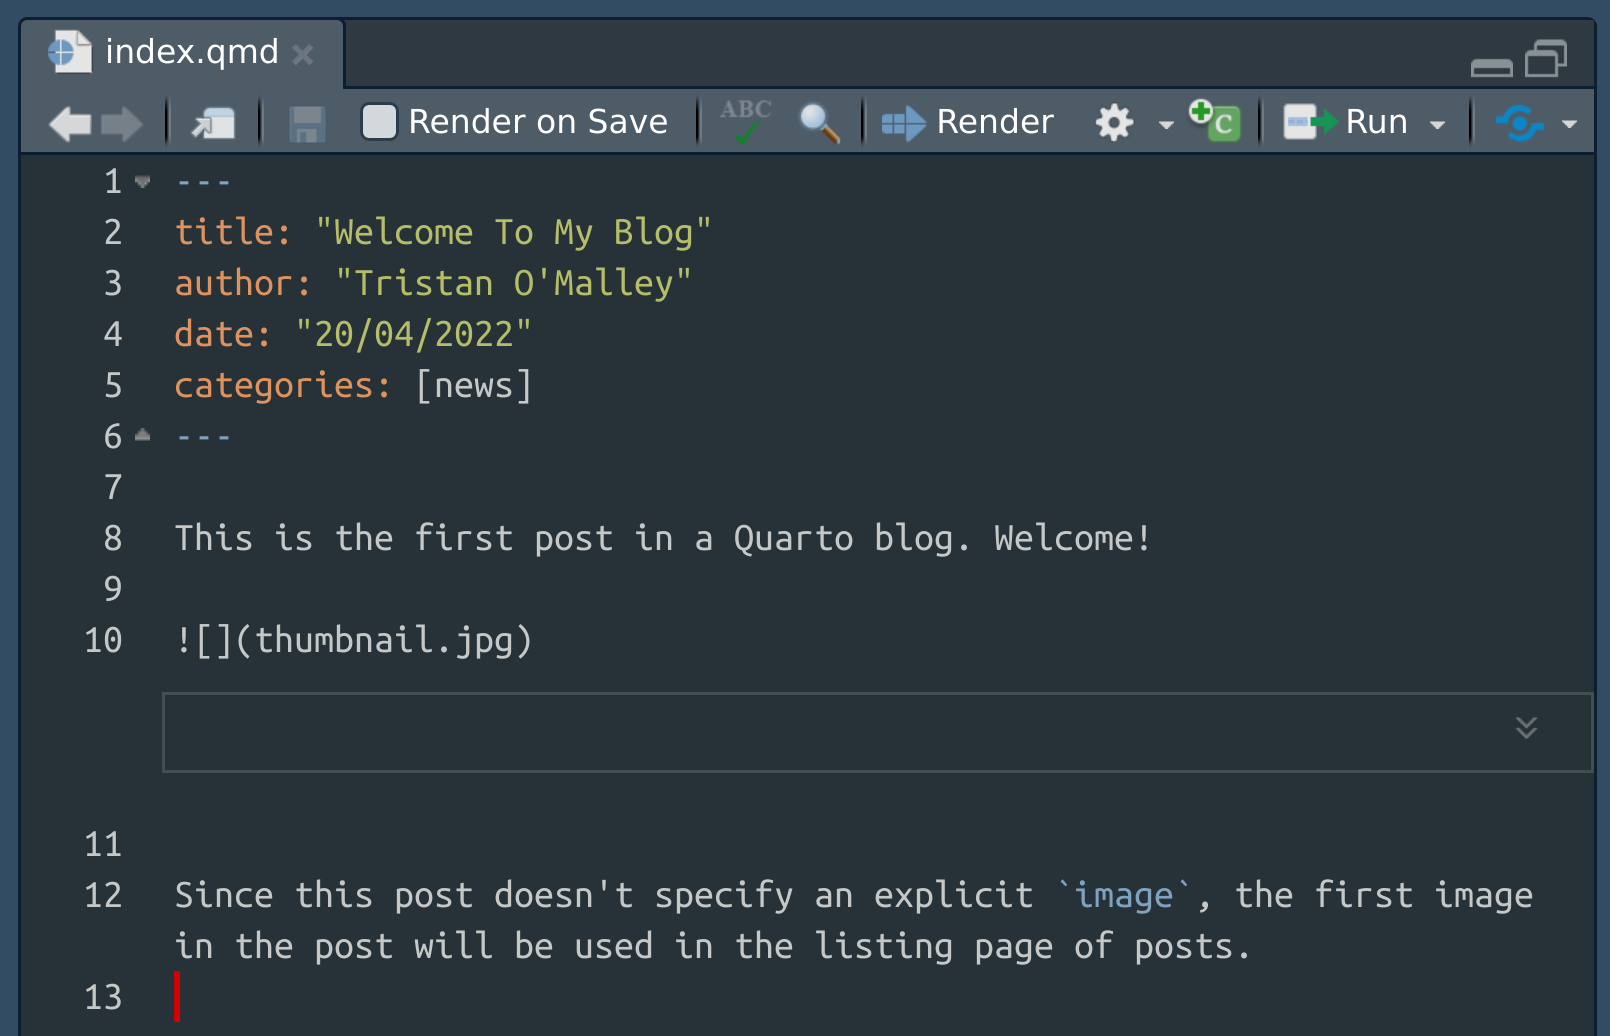
From here I can click on the “Render” button to render a single page, or alternatively I can go to the RStudio build pane and select the “Render Project” option to build the entire site. By default, the blog builds into the _site folder.
Playing around
Progress! I am making progress. However, before trying to do any other practical things, I have some very important business to attend to: playing around. Aimlessly exploring the functionality of a new tool is always fun, and I find it’s a good way to familiarise myself with something. I’m pretty familiar with R markdown already, and I imagine most readers of this post will be too, so for the most part there are no surprises. Still it is worth asking myself the usual questions:
A comment in the margin
Looking at the quarto article layout documentation, I discover some nice features. You can use the :::{.class} notation to apply a CSS class to a section of output, like this:
:::{.column-margin}
A comment in the margin
:::
The .column-margin class is handy for margin asides, but there are several other useful classes that come in handy when adding images to blog posts:
.column-bodyspans the usual body width of the post.column-body-outsetextends slightly outside the usual width.column-pagespans the whole page (including both margins).column-screenclass spans the full width of the screen.column-screen-insetclass stops just short of the full screen width
You can set these inside a chunk option. For example, setting column: margin as a chunk option will assign the output a .column-margin class, and any resulting figure will appear in the margin rather than below the code. Similarly, setting column: screen as the chunk option will assign the output a .column-screen class, and the output will span the full width. Here’s a simple example based pretty closely on the one used in the quarto documentation:
library(leaflet)
leaflet() %>%
  addTiles() %>%
  addMarkers(
    lng=151.22251,
    lat=-33.85943,
    label="Mrs Macquarie's Chair"
  ) %>%
  addProviderTiles(providers$CartoDB.Positron)
I confess. I’m a little bit in love already.
Notes on YAML headers
The YAML headers used for blog posts are a little different in quarto than their equivalents in distill were, and it takes me a moment to work out how to adapt the YAML headers from my old R markdown posts for the new quarto blog. Here’s a quick overview. First, some fields require almost no changes:
- The
titlefield is unchanged. That was an easy one! - The
datefield is essentially unchanged, except for the fact there seems to be a tiny bug in date parsing for blogs that I’m sure will vanish soon. If you’re using ISO-8601 date formats likedate: "2022-04-20"it will be fine.3 - The
categoriesfield takes a list of values, which (I think?) is no different to what it looked like before. To be honest I don’t remember because my old blog didn’t use them. I’ve started now.
Other changes are superficial:
- The
descriptionfield that I used on my old blog still does what it used to: it provides preview text on the listing page, and a summary at the top of the file. However, there is also asubtitlefield that you can use for this purpose, and the output has the same look and field as my old descriptions, so I decide to switch all my old description fields tosubtitleentries. - To specify a preview image associated with a blog post, use the
imagefield (e.g., something likeimage: thumbnail.jpg) instead of thepreviewfield from distill. - There is a new
licensefield that replaces thecreative_commonsfield from distill. At the bottom of this post you’ll see a “Reuse” appendix that links to a license file. To generate this, I’ve included alicense: "CC BY"line in the YAML.
Other changes are a little deeper:
- In distill it is possible to specify the
authorfield in a lot of detail, mirroring the academic convention of listing an authors affiliation alongside their employer, orcid record, and contact details. Quarto supports this also, though the tags have changed slightly:orcid_idis noworcid, for example. There’s an example of this shown a little later in the post. - Specifying the table of contents is slightly different. Just like in distill, you can turn on the table of contents by including
toc: trueas a line in the YAML header, and set thetoc-depthfield to determine how detailed the table of contents should be. But there are new options. You can customise the text that appears above the table of contents, and the location in which it appears. I decide to be boring and go with some standard options:toc-title: Table of contentsandtoc-location: left. - One feature in distill that I like is that it generates a citation for each post. You can do that in quarto too, and you’ll see at the bottom of this post that I’ve used that feature here. However, quarto manages this in a different way to distill, and uses a YAML version of citation style language (CSL) formatting to define the citation. To see how it works, you can read through the quarto pages on citations and creating citeable articles. It’s a little more elaborate than the distill version, but much more flexible. For this blog it’s as simple as including
citation: truein the YAML, but it can be more elaborate and accommodate any pattern of academic citation you like.
Creating a new post
Okay. Time to get to work at transforming the starter blog into a quarto version of my distill blog. My first step is to delete the two posts that came with the starter blog, and then create this one.
A folder with an index.qmd file is the bare minimum I need to get started with a new post. I suppose there are other ways do to this but what I actually do is create the the folder and an empty file from the terminal (for reasons known but to god):
mkdir posts/2022-04-20_porting-to-quarto
touch posts/2022-04-20_porting-to-quarto/index.qmd
To be honest, using the terminal was overkill. What I could have done instead, had I been looking at RStudio rather than the terminal, is use the “New File” option in the file menu and then select the “Quarto Doc” option. That creates a new untitled quarto document that you can save to the appropriate location.
Inheriting YAML settings
A handy feature in quarto websites is that YAML fields are inherited. For example, this post has its own YAML header that contains the following – and only the following – fields:
title: "Porting a distill blog to quarto"
subtitle: |
  I have moved this blog from distill over to quarto, and
  taken notes. A year after starting the blog, this promises
  to be an interesting reproducibility test
date: "2022-04-20"
categories: [Quarto, Blogging, Reproducibility]
image: "img/preview.jpg"
That’s a little peculiar, because a lot of the metadata needed to specify this post is missing. The reason it is missing is that I’ve placed some fields in the posts/_metadata.yml file. Those fields are inherited by every blog post. This is the entire contents of my post metadata file:
# Freeze computed outputs
freeze: true

# Enable banner style title blocks
title-block-banner: true

# Enable CC licence appendix
license: "CC BY"

# Default for table of contents
toc: true
toc-title: Table of contents
toc-location: left

# Default knitr options
execute:
  echo: true
  message: true
  warning: true

# Default author
author:
  - name: Danielle Navarro
    url: https://djnavarro.net
    affiliation: Voltron Data
    affiliation-url: https://voltrondata.com
    orcid: 0000-0001-7648-6578

# Default fields for citation
citation: true
The freeze option is extremely useful in the blogging context. I’d advise reading the linked documentation page!
That explains a lot, but if you’re looking closely you’ll realise that there’s nothing in these fields specifying the output format! In R markdown I’d have included an output field for this, but in quarto the relevant field is called format. Because the output applies to the entire site, that part of the YAML header is in the _quarto.yml file. The relevant lines of that file are:
format:
  html:
    theme: ember.scss
    css: styles.css
I’ll come back to this later. For now it’s enough to recognise that this indicates that all pages on this site should be rendered to HTML documents, and using the ember.scss and styles.css files specify the blog style.
Converting my old posts
The time has come for a little manual labour. Although quarto is compatible with most existing R markdown and I can probably get away with leaving them untouched, in the longer term I’m expecting that I’ll be moving across languages so it appeals to me to take this opportunity to port everything over to quarto now. Renaming all the index.Rmd files to index.qmd files is easy enough, and can be done programmatically, but most of my edits require a small amount of manual tinkering with each post. Not a lot, because it is mostly a matter of renaming a few YAML fields. Given that there are only 20 or so posts that need to be ported, I decide it is easier to do it manually than to try to write a script to automate the task. I get through it in an afternoon.
Styling the new blog
Up to this point, the adoption of quarto has felt very “distill-like”. The structure of the blog feels familiar from distill, the YAML headers are similar in spirit (if different in the particulars), and so on. When it comes to customising the appearance of the blog, it’s not very similar to distill at all, and feels more similar to simple R markdown sites. Quarto websites are bootstrap based, and as discussed on the quarto theming page, they come with the same bootswatch themes that you might be familiar with from R markdown. For example, if you decide like I did that you would like a very plain white theme, you could choose the “litera” theme. To apply this to your blog, all you’d have to do is make sure your _quarto.yml file contains the following lines:
format:
  html:
    theme: litera
    css: styles.css
What this does is assert that output will be rendered as HTML objects using the litera bootswatch theme, and applying any custom CSS rules that you add in the styles.css file.
One very nice feature of quarto, if you’re comfortable using SASS to define styles and know something about how the bootstrap SASS files are organised,4 is that it allows you to write your own .scss file to define your blog theme more precisely, giving you access to bootstrap parameters and so on. I would strongly recommend reading about the quarto theming system before tinkering with this aspect yourself, but if you are more knowledgeable (or more foolish) than I, here’s how I set my blog up. First, instead of referring to the litera theme, the YAML in my _quarto.yml file points at my own custom .scss file:
format:
  html:
    theme: ember.scss
    css: styles.css
The contents of the ember.scss file are as follows:
/*-- scss:defaults --*/

// use litera as the base
$theme: "litera" !default;

// import google fonts
@import 'https://fonts.googleapis.com/css2?family=Atkinson+Hyperlegible:ital,wght@0,400;0,700;1,400;1,700&display=swap';
@import 'https://fonts.googleapis.com/css2?family=Fira+Code:wght@300;400;500;600;700&display=swap';

// use Atkinson Hyperlegible font if available
$font-family-sans-serif:  "Atkinson Hyperlegible", -apple-system, BlinkMacSystemFont, "Segoe UI", Roboto, "Helvetica Neue", Arial, "Noto Sans", sans-serif, "Apple Color Emoji", "Segoe UI Emoji", "Segoe UI Symbol", "Noto Color Emoji" !default;

/*-- scss:rules --*/

// litera is serif by default: revert to san-serif
p {
  font-family: $font-family-sans-serif;
}
As you can see, right now my customisation really doesn’t do much other than make some very minor tweaks on the litera theme, but the potential is there to do so much more than I have in setting up this blog. I plan to tinker with this more later on!
Adding an RSS feed
My old distill blog had an RSS feed, and while I acknowledge that it’s increasingly an esoteric feature that most folks don’t use, I have a fondness for RSS. Quarto supports this, but it’s not enabled by default. What I need to do is edit the YAML in the index.qmd file that corresponds to your homepage, because that’s where I have my primary listing of posts. In it, I see a listing field. All I need to do is add feed: true underneath and there is now an RSS feed for the site:
title: "Notes from a data witch"
subtitle: A data science blog by Danielle Navarro
listing:
  feed: true
  contents: posts
The quarto section on feeds has more information on this.
Deploying the site
Preparing the site to be deployed is relatively painless. I found it useful to read the quarto website options page before doing this, because it mentions a lot of settings to tinker with, mostly in the _quarto.yml file. For example, I choose to customise the navigation bar, the social media preview images, and so on. Eventually, I reach the point where I am happy and move on to deployment.
Happily, as to the deployment process itself, there’s not a lot to say. The quarto deployment page discusses several options for how you can do this. Most of my websites are deployed either through GitHub Pages or through Netlify. This one is a Netlify site, so I follow the instructions there and everything goes smoothly. However, this does bring me to another topic…
Netlify redirects
I’ve structured my blog in a particular way. Like the default quarto blog, all the posts live in the posts folder, and they’re named in a systematic way: they have an ISO-8601 formatted date first, and then a semantic slug. So the full URL for this blog post is:
blog.djnavarro.net/posts/2022-04-20_porting-to-quarto
That’s convenient for archiving purposes and for keeping everything nicely organised in my project folder, but it’s also a little clunky for sharing links. In practice, the “posts” part is a bit redundant, and I’m never going to use the same slug twice, so it’s handy to set it up so that there’s also a shorter URL for the post,
blog.djnavarro.net/porting-to-quarto
and that this shorter URL automatically redirects to the longer one.
Since I’m intending to deploy this blog to Netlify, what I need to do is ensure that whenever the site builds, a _redirects file is created within the _site folder. This file needs to have one line per redirect, listing the “redirect from” path first, followed by the “redirect to” path. Here’s what that line looks like for this post:
/porting-to-quarto /posts/2022-04-20_porting-to-quartoI have no intention of adding these lines manually, so what I do instead is add an R chunk to the index.qmd file corresponding to the blog home page, with the following code:
# list names of post folders
posts <- list.dirs(
  path = here::here("posts"),
  full.names = FALSE,
  recursive = FALSE
)

# extract the slugs
slugs <- gsub("^.*_", "", posts)

# lines to insert to a netlify _redirect file
redirects <- paste0("/", slugs, " ", "/posts/", posts)

# write the _redirect file
writeLines(redirects, here::here("_site", "_redirects"))
Every time this site gets rebuilt – which usually involves rebuilding the home page since that’s the one that contains the post listing – the _redirects file gets refreshed. There might be a cleaner way, but this works.
The quarto CLI
Something I forgot to mention earlier. About half way through the process of tinkering with my old posts to be suitable for the quarto blog, I decided to stop using RStudio for the rendering, and spent a little time familiarising myself with the quarto command line interface. I haven’t made any particular decisions about what my long term workflow with quarto is going to look like, but I did find it helpful to get a feel for the concept of quarto as a standalone install. I’m not going to go into detail here, but just briefly: at the terminal I can see that I have some help options,
  Usage:   quarto
  Version: 0.9.282


  Description:

    Quarto CLI

  Options:

    -h, --help     - Show this help.
    -V, --version  - Show the version number for this program.

  Commands:

    render          [input] [args...]  - Render input file(s) to various document types.
    serve           [input]            - Serve an interactive document.
    create-project  [dir]              - Create a project for rendering multiple documents
    preview         [file] [args...]   - Render and preview a Quarto document or website project. Automatically reloads the browser when
    convert         [input]            - Convert documents to alternate representations.
    capabilities                       - Query for current capabilities (output formats, engines, kernels etc.)
    check           [target]           - Check and verify correct functioning of Quarto installation and computation engines.
    inspect         [path]             - Inspect a Quarto project or input path. Inspecting a project returns its config and engines.
    tools           [command] [tool]   - Manage the installation, update, and uninstallation of useful tools.
    help            [command]          - Show this help or the help of a sub-command.
From there I can check the help documentation for the quarto render command by typing the following,
quarto render helpand so on. Browsing this documentation in addition to all the excellent content on the quarto website is a useful way of finding additional options. If I wanted to render the current post, and my terminal was currently at the project root folder (i.e., my quarto-blog folder), I can render it as follows:
quarto render posts/2022-04-20_porting-to-quarto/index.qmdThe ability to do this cleanly from the terminal seems like a handy feature of quarto, though I’ll admit I am not yet sure how I’ll use it.
Epilogue
When I started this process I wasn’t quite sure if I was going to follow through on it and actually switch the blog over to quarto. The distill blog has served me well for the last year, and I don’t like fixing things if they aren’t broken. However, the longer I played with quarto the more I liked it, and the process was far less painful than I feared it would be. I feel like it’s retained the things I like about distill, but integrated those cleanly with other features (e.g., the bootstrap grid!) that I really missed having access to from distill. Every now and then I’ve come across little quirks where some of the rough edges to quarto are still showing – it is a new tool still – but I’m enjoying it a lot.
Last updated
2023-05-27 17:54:09.879594
Details
Footnotes
Yes↩︎
In case you’re interested: the “Welcome to My Blog” post in the starter blog lists the date as
date: "20/04/2022", which gets parsed as a string literal when the post gets built (i.e., the post date shows up as “20/04/2022”), sensibly enough. However, when you build the entire site it renders as “May 4, 2023”.↩︎Which, frankly I do not, but I am also foolish and will try things anyway↩︎
Reuse
Citation
BibTeX citation:
@online{navarro2022,
  author = {Navarro, Danielle},
  title = {Porting a Distill Blog to Quarto},
  date = {2022-04-20},
  url = {https://blog.djnavarro.net/posts/2022-04-20_porting-to-quarto/},
  langid = {en}
}
For attribution, please cite this work as: